In this blog post I’ll be going through a Test Scenario which involves multiple Test Cases with some interesting checks. I will be covering only the new things I’ve added for this Test Scenario when compared to my earlier posts, which can be found here. Test Suite begins by validating the network status on a particular device, this involves checking protocols such as OSPF, BGP, Interface Status etc. After ensuring network is in steady state, a configuration change is executed and after the change, network is validated again to ensure there has been no network impact.
Variables
I will be using a yaml file to input the variables, this becomes convenient as we can extract data from yaml as lists, dicts etc.
---
device:
    ip: '66.129.234.213'
    user: 'robot'
    pwd: 'robot123'
    port: '49003'
interface:
    up_count: 48
ospf:
    nbr_full: 3
bgp:
  peers_up: 1
system_alarms:
  active_count: 2
configure:
  intf1:
    name: 'ge-0/0/4'
    unit: 0
    ipv4_addr: '192.168.1.1/24'
    ipv6_addr: '1::1/64'
    descr: "Testing RF"
    family: inet
    group: ALL
  save_cfg: True
  save_format: set
First dictionary from the variables file, device, has the details needed to login to the device. As in my previous posts, I will be using Junos PyEz to interact with the device. Dictionary named configure has the parameters required for configuration change, I will go through what exactly will be configured in later sections.
Resource
By this blog post we know that the Keywords needed in our Test Suite will be defined as a Python Function in Resource file.
from jnpr.junos import Device
from jnpr.junos.utils.config import Config
import xml.etree.ElementTree as ET


def connect_to_device(host, user, pwd, port):
    dev = Device(host=host, user=user, password=pwd, port=port)
    dev.open()
    return dev


def teardown(device):
    device.close()


def intf_up_count(device):
    intf_xml = device.rpc.get_interface_information(terse=True)
    physical_up_count = intf_xml.xpath(".//physical-interface[oper-status='\nup\n']")
    logical_count = intf_xml.xpath(".//physical-interface/logical-interface[oper-status='\nup\n']")
    return len(physical_up_count)+len(logical_count)


def ospf_nbr_count(device):
    ospf_xml = device.rpc.get_ospf_neighbor_information()
    full_nbr_count = ospf_xml.xpath(".//ospf-neighbor[ospf-neighbor-state='Full']")
    return len(full_nbr_count)


def bgp_up_count(device):
    bgp_xml = device.rpc.get_bgp_summary_information()
    total_peers = bgp_xml.findtext(".//peer-count")
    down_peers = bgp_xml.findtext(".//down-peer-count")
    return int(total_peers)-int(down_peers)


def sys_alarm_check(device):
    alarm_xml = device.rpc.get_system_alarm_information()
    alarm_count = alarm_xml.findtext(".//active-alarm-count")
    return int(alarm_count)


def cfg_back(device, cfg_format):
    conf_xml = device.rpc.get_config(options={'format': cfg_format})
    conf_str = ET.tostring(conf_xml)
    conf_list = conf_str.decode('UTF-8').splitlines()[1:-1]
    hostname = device.facts['hostname']
    with open(f"{hostname}_backup", "w") as f:
        for line in conf_list:
            f.write(f"{line}\n")
    return hostname


def configuration(device, config_vars):
    with Config(device, mode='private') as cu:
        cu.load(template_path='config.conf', template_vars=config_vars, merge=True, format='set')
        result = cu.commit()
        return result
As you can see, there are a lot of keywords this time! As mentioned earlier, I’m using Junos PyEz here and the RPCs it offers to interact with the device. Although I’m not going go over each line of this code, as it is quite straight forward, I would still like to mention couple of them. cfg_back is a function to retrieve the current configuration in given format(json,set,xml) and back it up to a file. I’m using the RPC get_config() here, which extracts the configuration in given format but the output of RPC is still in xml. So a couple of lines of code to sanitize the output from device and store it in a file named after the hostname of the Device Under Testing (DUT). Please refer Junos PyEz documentation to know more about retrieving configuration from a device.
configuration function is used to make required configuration changes on the device. Junos PyEz has an utility named Config which I will be using here to make the configuration changes. To generate the required configuration, jinja2 template is used and the required variables are taken from the Variables file. template_path is the location of the jinja2 template and template_vars is the dictionary of variables for the jinja2 template which here comes from Variables file. More information on the Junos PyEz Config utility can be found here
set interfaces {{ name }} unit {{ unit }} description "{{ descr }}"
{% if ipv4_addr %}
set interfaces {{ name }} unit {{ unit }} family inet address {{ ipv4_addr }}
{% endif %}
{% if ipv6_addr %}
set interfaces {{ name }} unit {{ unit }} family inet6 address {{ ipv6_addr }}
{% endif %}
set interfaces {{ name }} apply-groups {{ group }}
set groups {{ group }} interfaces <*> mtu 1400
# This is from the yaml file used as Variables file (template_vars).
configure:
  intf1:
    name: 'ge-0/0/4'
    unit: 0
    ipv4_addr: '192.168.1.1/24'
    ipv6_addr: '1::1/64'
    descr: "Testing RF"
    family: inet
    group: ALL
  save_cfg: True
  save_format: set
Keywords
Keywords file is a collection of Keywords, having a Keywords file separately rather than defining Keywords in Test Suite itself is quite handy. Same Keywords file can be re-used in multiple Test Suites and any new Keyword would be added here to make it readily available in all the Test Suites using this Keywords file. And since this is a robot file, we can make use of various builtin keywords available in RF.
*** Keywords ***

Interface Up Count
    [Documentation]      Keyword to check and verify number of interfaces that are UP
    [Arguments]          ${device}
    ${int_up}            Intf Up Count    ${device}
    should be equal    ${int_up}     ${interface.up_count}

Ospf Neighbor Count
    [Documentation]     Keyword to check and verify number OSPF neighbors in Full State
    [Arguments]         ${device}
    ${ospf_full}        OSPF Nbr Count    ${device}
    should be equal    ${ospf_full}     ${ospf.nbr_full}

BGP Neighbor Count
    [Documentation]    Keyword to check and verify the number of BGP Peers that are UP
    [Arguments]    ${device}
    ${bgp_up}     BGP Up Count    ${device}
    should be equal    ${bgp_up}    ${bgp.peers_up}

System Alarm Check
    [Documentation]    keyword to check and verify system alarm count
    [Arguments]    ${device}
    ${sys_alarms}    Sys Alarm Check    ${device}
    should be equal    ${sys_alarms}    ${system_alarms.active_count}

Configuring Device
    [Documentation]    keyword to make the required config changes
    [Arguments]    ${device}    ${config_vars}
    ${result}    ${diff}    Configuration     ${device}     ${config_vars}
    should be true    ${result}
    log to console    \nConfiguration applied successfully!
    log to console    \n~~~~ Config Diff ~~~~\n${diff}\n

Config Backup
    [Documentation]    keyword to save the config before making changes, format can be set, json, xml.
    [Arguments]    ${device}    ${cfg_format}
    ${filename}    Cfg Back    ${device}    ${cfg_format}
    log to console    \nBackup Filename: ${filename}
Again, quite a few Keywords but if you look closely, they are all similar, so let’s go over a couple of them. Interface Up Count as documentation states, is used to check and verify the number of UP interfaces. This Keyword expects one argument, ${device} which will be passed from Test Suite file. ${int_up} is the variable used to hold the output from the Keyword Intf Up Count, which is nothing but a function defined in the Resource file, shown below for quick reference.
def intf_up_count(device):
    intf_xml = device.rpc.get_interface_information(terse=True)
    physical_up_count = intf_xml.xpath(".//physical-interface[oper-status='\nup\n']")
    logical_count = intf_xml.xpath(".//physical-interface/logical-interface[oper-status='\nup\n']")
    return len(physical_up_count)+len(logical_count)
Output from the function/keyword is then passed to the builtin keyword should be equal to compare the extracted value with the expected value ${interface_count}, dictionary named interface with the key up_count in the Variables file.
Keyword Configuration Device is worth taking a look as well, this one expects two arguments ${device} and ${config_vars}. As mentioned earlier, ${config_vars} is a dictionary with variables required by jinja2 template to generate the required configuration. This keyword returns 2 values, one if the configuration was successful or not and two the configuration difference between the running and candidate config.
Test Suite
Everything comes together now in the Test Suite file, let’s break it down and take a look at it in sections.
*** Settings ***
Library         functions.py
Variables       var.yml
Suite Setup     Test Suite Setup
Resource        my_keywords.robot
Suite Teardown    Test Suite Teardown
Settings section is used to define the various files required for the Test Suite, new to this Test Suite is Suite Setup. This is used to execute anything before running the Test Cases in the Test Suite, and in this case we will be initiating the connection to the device as a part of Suite Setup. Similarly, we have Suite Teardown which is executed after all the Test Cases are executed.
*** Keywords ***
Test Suite Setup
    [Documentation]    To initialise connection to the device

    ${conn}    Connect To Device    ${device.ip}    ${device.user}    ${device.pwd}    ${device.port}
    Set Suite Variable            ${conn}

Test Suite Teardown
    [Documentation]    To close the connection to the device gracefully

    Teardown    ${conn}
Test Suite Setup as mentioned earlier, is used to initialise a connection to the device, this is done using a keyword (in other words Python function) Connect To Device. ${conn} variable holds the return value from the keyword, which is nothing but the Device Object. Set Suite Variable is used to ensure the variable ${conn} is available throughout the Test Suite. Test Suite Teardown is used to close the connection to the device gracefully.
Continuing with the Test Suite, we reach the Test Cases section. I have included 3 Test Cases, one to check the network state before change, two to make the configuration change and three to check the network state post change to validate.
*** Test Cases ***
TC - Pre checks before the configuration change & config backup
    [Documentation]     In this testcase various network functions will be checked and matched against a given set
    ...    of ideal values. Test Case would fail if there are any mismatches

    Sanity Checks    ${conn}

    # Backup the current configuration before change
    run keyword if    ${configure.save_cfg}==True
    ...    run keyword and continue on failure    Config Backup         ${conn}    ${configure.save_format}

TC - Configuring the device
    [Documentation]    Configure the device using "config.conf" as the Jinja2 template, with variables from var.yml
    ${config_vars}    set variable    ${configure.intf1}
    run keyword and continue on failure    Configuring Device    ${conn}    ${config_vars}
    log to console    \nWait for 5sec before starting the Post checks
    sleep    5

TC - Post checks after the configuration change
    [Documentation]     In this testcase various network functions will be checked and matched against a given set
    ...    of ideal values. Test Case would fail if there are any mismatches

    Sanity Checks    ${conn}
Sanity Checks is a keyword which has a bunch of tests to be run as a part of network validation, shown below. run keyword if as it says, would be executed when a given condition is met. In this case, we are checking if variable ${configure.save_cfg} is set to True, this value again comes from the Variables file. When True, Config Backup keyword is executed which as seen before saves the current configuration to a .txt file.
Sanity Checks
    [Documentation]    list of checks to run before and after a configuration change
    [Arguments]    ${conn}

    log to console    \nVerifying Interface UP count
    run keyword and continue on failure    Interface Up Count    ${conn}

    log to console    \nVerifying OSPF Neighbor UP count
    run keyword and continue on failure    Ospf Neighbor Count    ${conn}

    log to console    \nVerifying BGP Peer UP count
    run keyword and continue on failure    BGP Neighbor Count    ${conn}

    log to console    \nVerifying System Alarms
    run keyword and continue on failure    System Alarm Check    ${conn}
Going past the documentation part, we see 4 keywords in action, with the majority of them using the builtin run keyword and continue on failure option. This is a handy option when you’re running a bunch of tests and you don’t want the test execution to stop when there is a failure. With this option, we can ensure that all the tests are run and failures are captured if any.
Test Execution
With all the required bits in place, let’s go ahead with Test Execution.
(venv) sohanr@sohanr-mbp Robot_practise % robot configure_tc.robot
==============================================================================
Configure Tc
==============================================================================
TC - Pre checks before the configuration change & config backup ::...
Verifying Interface UP count
Verifying OSPF Neighbor UP count
Verifying BGP Peer UP count
Verifying System Alarms
.
Backup Filename: vMX1
TC - Pre checks before the configuration change & config backup ::... | PASS |
------------------------------------------------------------------------------
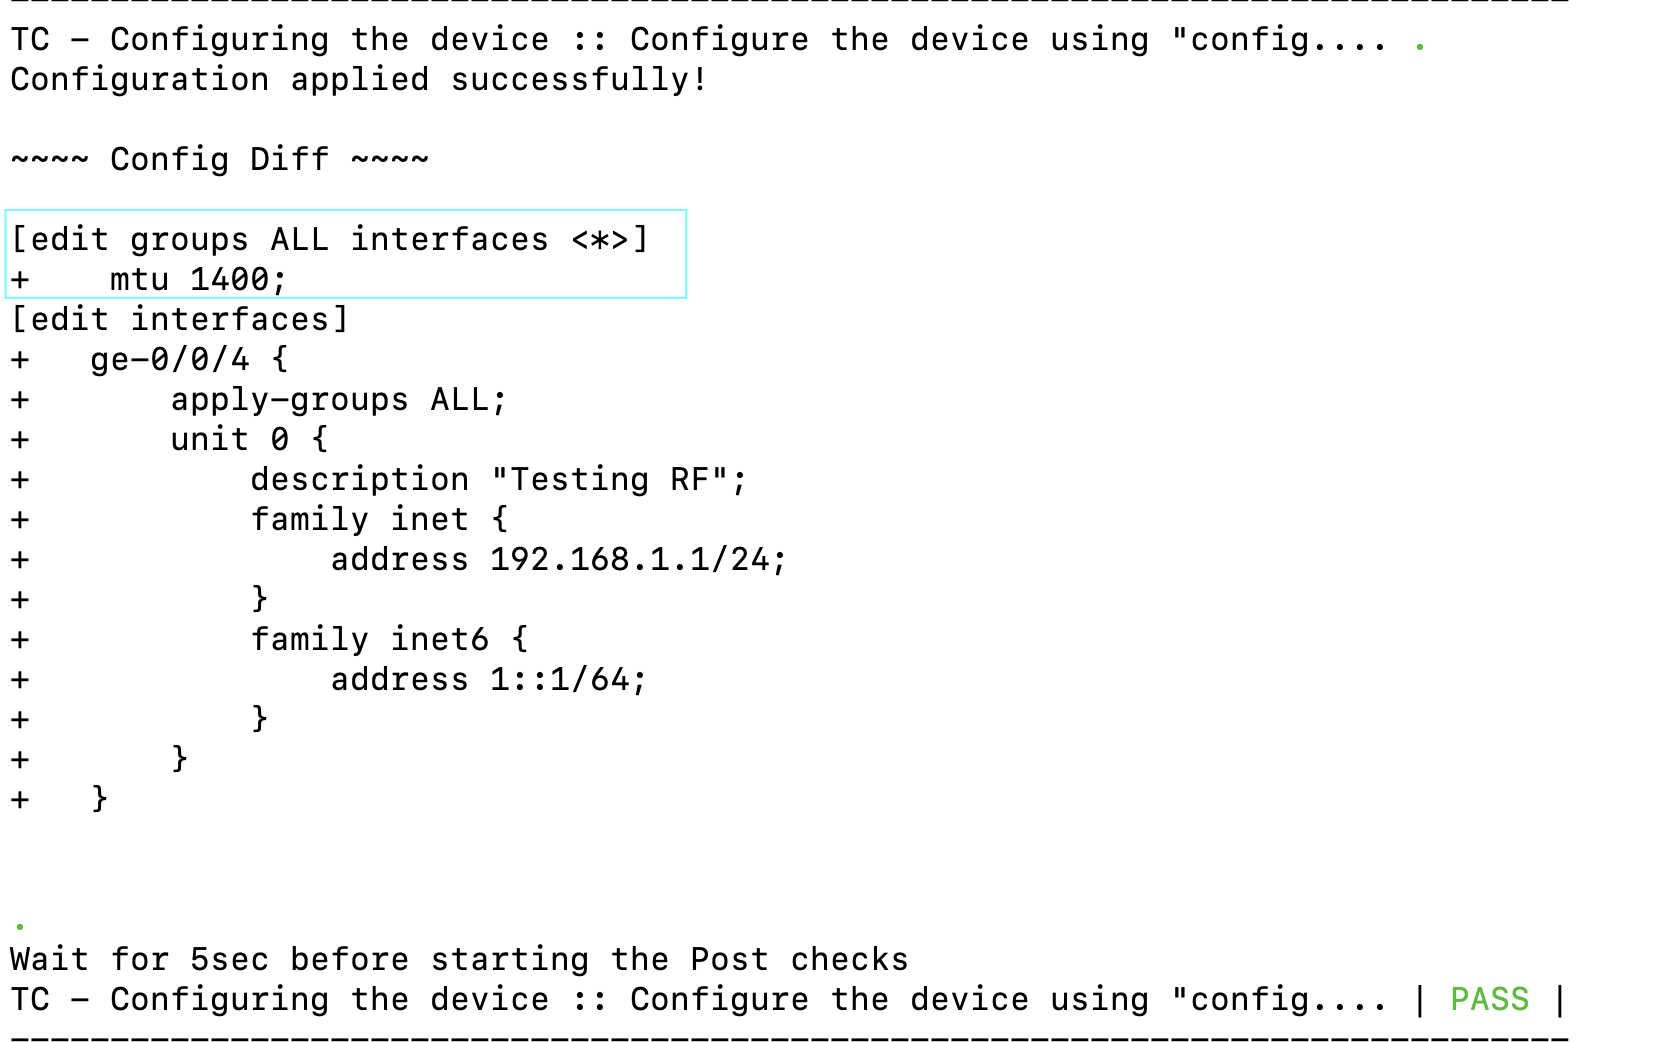
TC - Configuring the device :: Configure the device using "config.... .
Configuration applied successfully!
~~~~ Config Diff ~~~~
[edit groups ALL interfaces <*>]
+ mtu 1400;
[edit interfaces]
+ ge-0/0/4 {
+ apply-groups ALL;
+ unit 0 {
+ description "Testing RF";
+ family inet {
+ address 192.168.1.1/24;
+ }
+ family inet6 {
+ address 1::1/64;
+ }
+ }
+ }
.
Wait for 5sec before starting the Post checks
TC - Configuring the device :: Configure the device using "config.... | PASS |
------------------------------------------------------------------------------
TC - Post checks after the configuration change :: In this testcas...
Verifying Interface UP count
Verifying OSPF Neighbor UP count
Verifying BGP Peer UP count
Verifying System Alarms
TC - Post checks after the configuration change :: In this testcas... | FAIL |
0 != 3
------------------------------------------------------------------------------
Configure Tc | FAIL |
3 tests, 2 passed, 1 failed
==============================================================================
Output: /Users/sohanr/PycharmProjects/Robot_practise/output.xml
Log: /Users/sohanr/PycharmProjects/Robot_practise/log.html
Report: /Users/sohanr/PycharmProjects/Robot_practise/report.html
(venv) sohanr@sohanr-mbp Robot_practise %
We see all our 3 Test Cases were executed with Test Case TC - Post checks after the configuration change failing, we will come back to this but before that, let’s appreciate the Test Case TC - Configuring the device shall we? We see the TC passed, which means the configuration on the device was successful and we also see a config difference being printed out, neat, right?
Now coming to the failure, from the execution we see that TestCase TC - Post checks after the configuration change failed, which means some check in Sanity Checks failed. We can also see 0 != 3 is the reason for failure, but it is not clear from here what exactly failed. As I have mentioned in my earlier posts as well, the best thing about using RF for testing, in my opinion, is the logs and reports being available in html, makes it easy to view in a browser. Checking the report generated for our Test Execution, we can clearly see that out of our 3 TCs, 2 Passed and 1 Failed. Now looking at the log, we can see Test Suite Setup and Test Suite Teardown, expanding the sections, we can see what exactly happened.
Let’s take a look at couple of sections together, rest you should be able to explore yourself as it is quite intuitive.
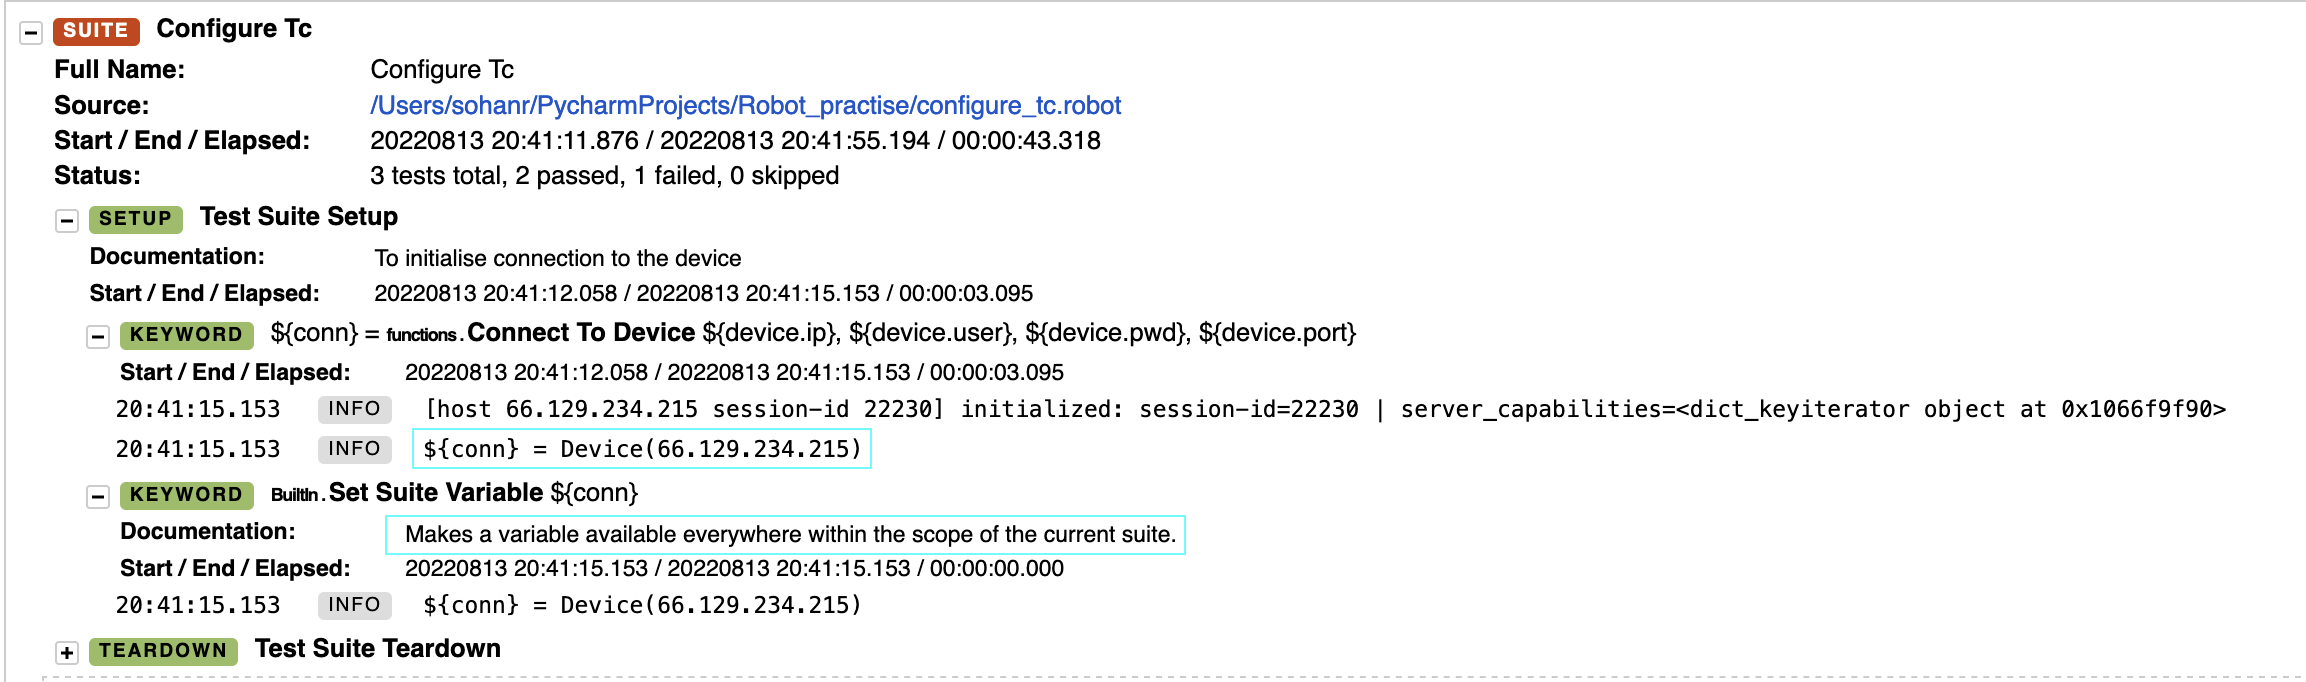
I have highlighted couple of things to make it easy to look, first one is where we see the device object being returned by Junos PyEz. Second one is where we see the variable which has the device object being set as Suite Variable, documentation makes it clear!
Now, let’s take a look at one of checks being done in TC 1, TC - Pre checks before the configuration change & config backup
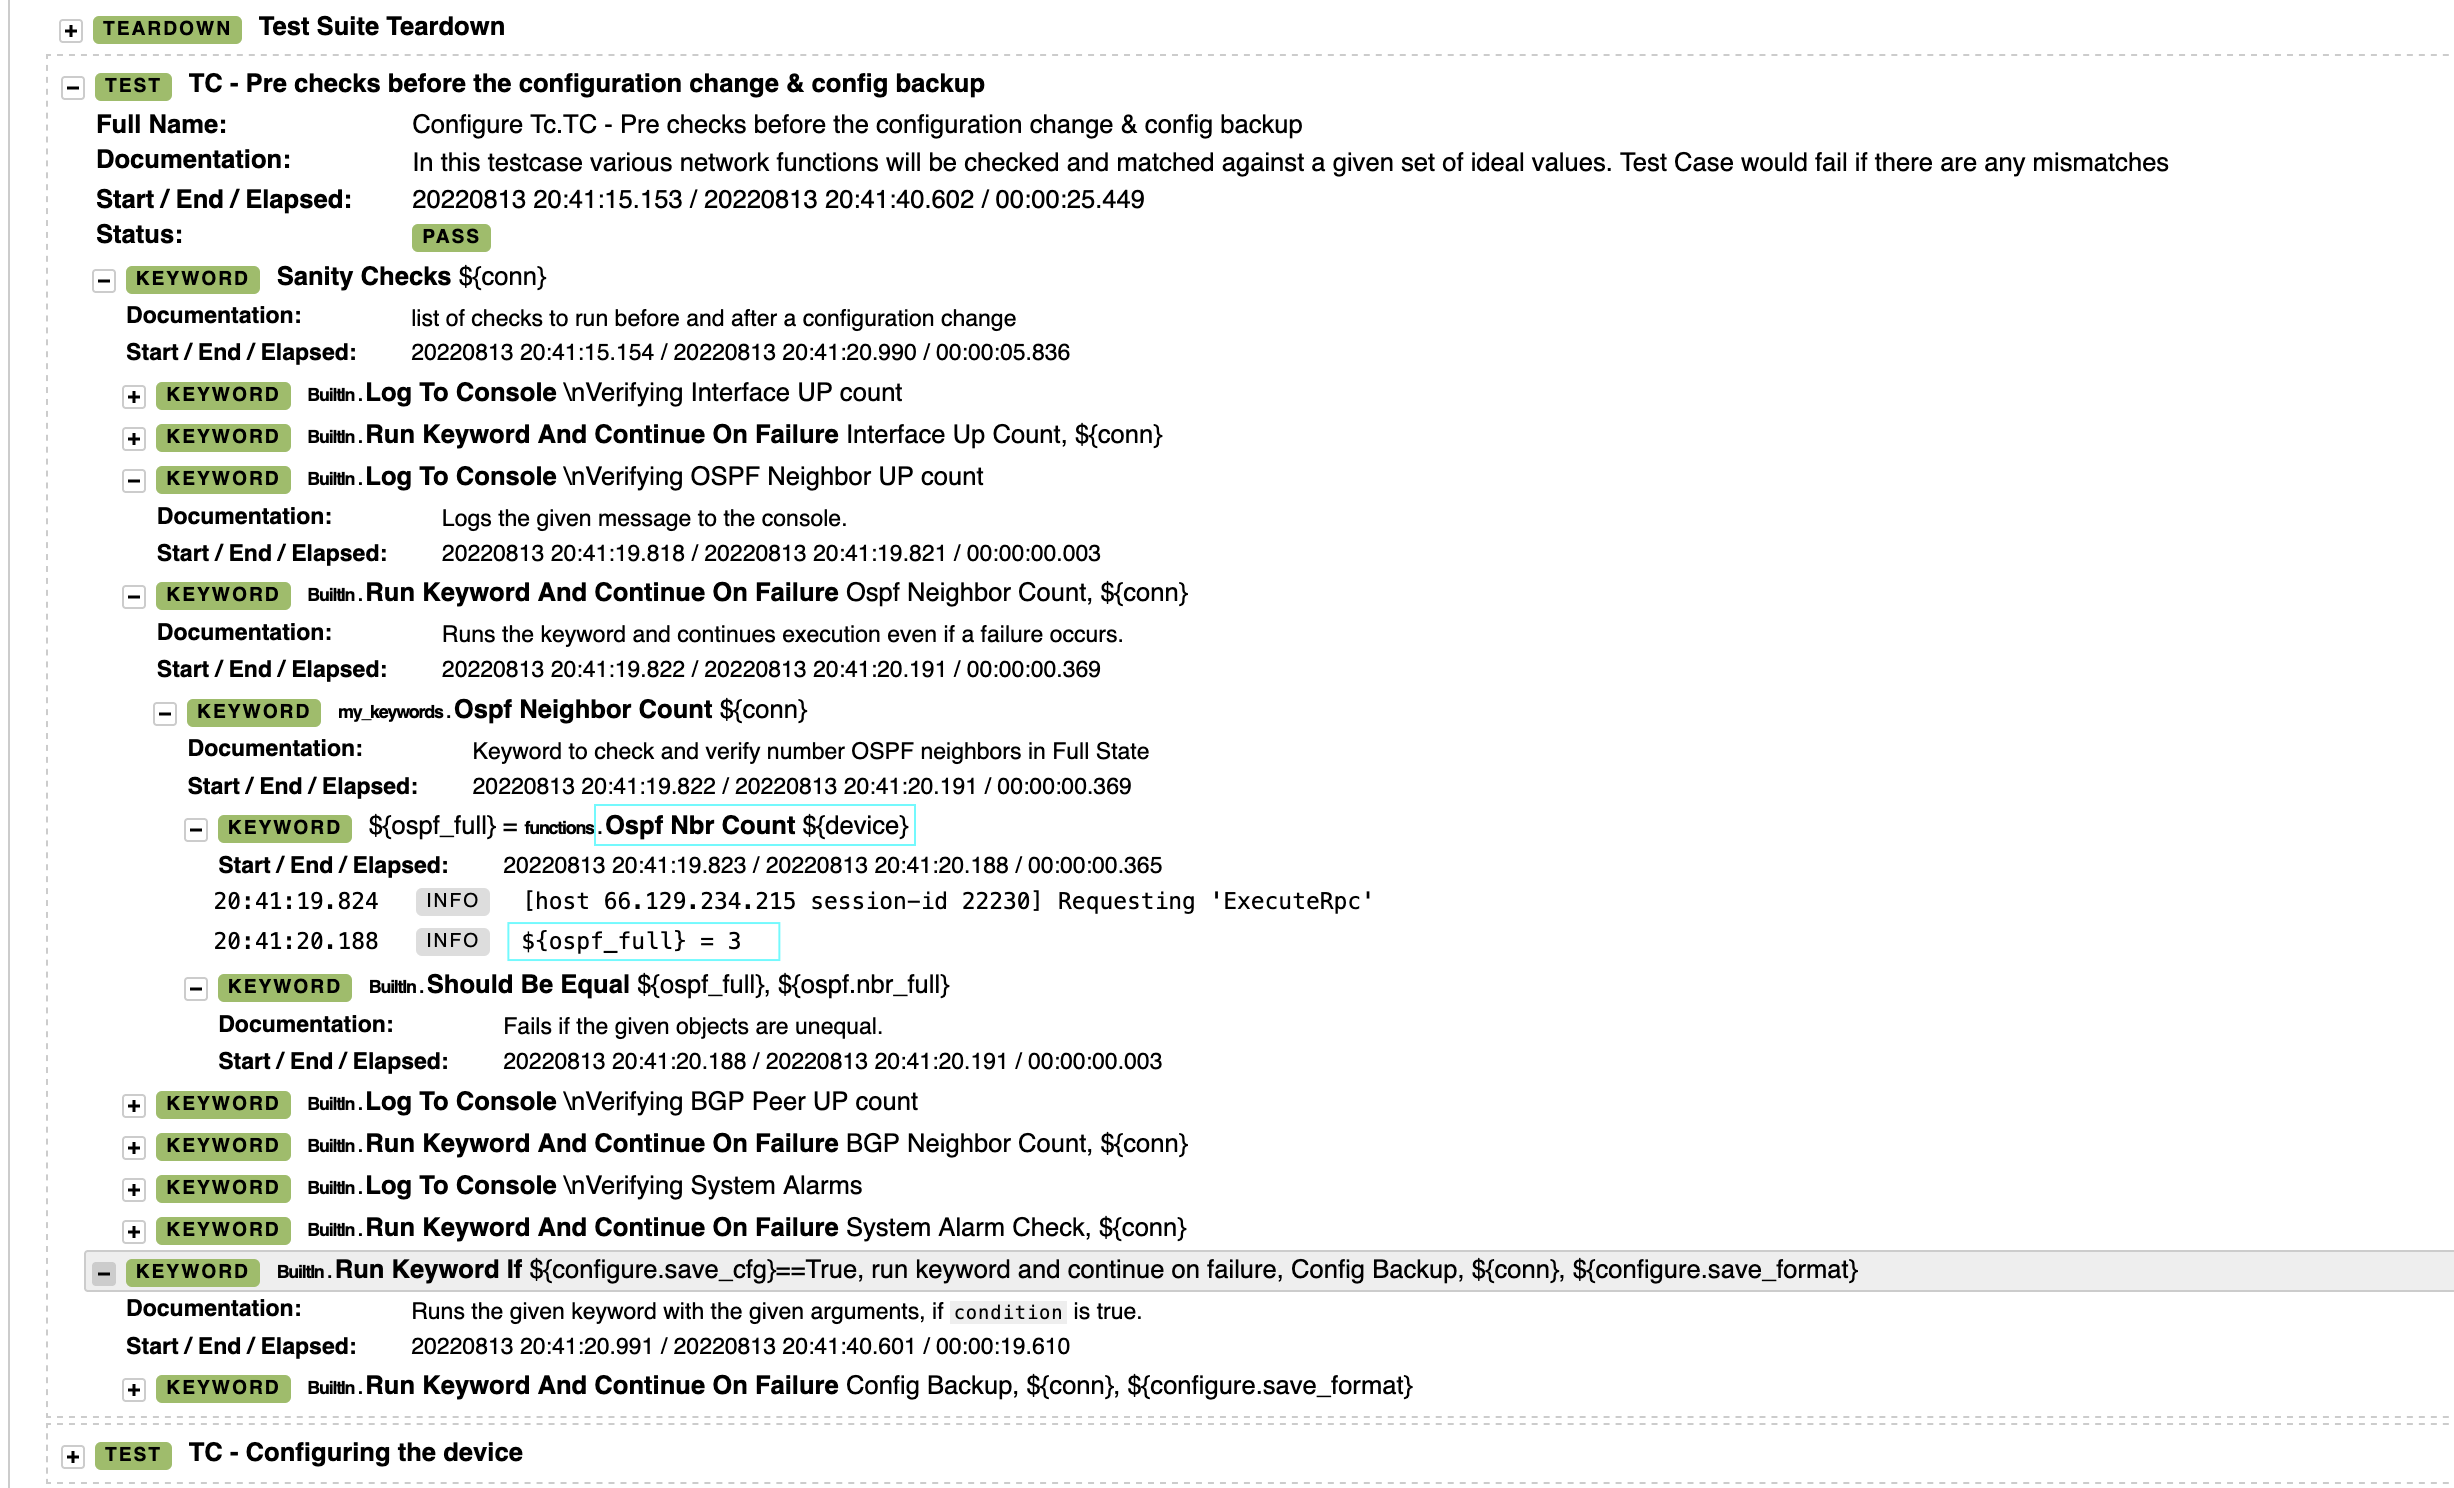
Here we see keyword Sanity Checks getting executed first, within which we have several keywords. Moving to Ospf Neighbor Count keyword, we can see Ospf Nbr Count being called which is defined in our Python file. This keyword or function returns the number of OSPF Neighbors in Full state, which in this is case is 3. Next, we see our verification Should Be Equal, checking if the value we defined is equal to the extracted value.
Moving to Test Case TC - Post checks after the configuration change, where the failure occurred, let’s see if we can make sense of the failure.
 We can see that failure is seen in
 Ospf Neighbor Count keyword, we can see Ospf Nbr Count returning 0, which means there are no OSPF neighbors on the device in Full State. Due to this our verification fails as our expected value is 3 but the extracted value is 0! Checking on the device, we can see why.

We see all our OSPF neighbors in Exstart state! Looking closely at the configuration changes made.
One of our changes included changing the MTU value to 1400 for a group, ALL, which is being applied on the all the interfaces!
This may not have been a particularly difficult issue to troubleshoot manually but using RF we were able to test and ensure if our change was successful or not. Let’s say you want to add few more checks to your Test Suite, just write Python functions and create keywords in Keywords file, easy! Or you are performing a Software Upgrade and want to run some pre and post checks to ensure nothing is broken, you can write a Test Suite like this to automate the checks and the upgrade itself!
I know there was a lot to go through in this post, I highly recommend having the code in front of you to help you understand better. I hope I have been clear in explaining everything, if not, please reach out to me with your feedback so that I can do a better job next time.
Reference
- Junos PyEz developer guide is a great place to start if you’re new to Junos PyEz
- RobotFramework official user guide is extensive and gives you all the information you need to get started with RF
- Junos vLABs offers sandboxes with a wide variety of topologies to get a good hands-on experience on Junos.
- Simple Junos PyEz scripts to start with.